$\newcommand{\boldr}{{\bf R}}$
$\newcommand{\xbar}{\overline{x}}$
Using WeBWorK at Radford University
This is intended as a guide to using WeBWorK 2.10 for instructors at Radford University. It is current as of November 2020.
This guide assumes that a WeBWorK administrator has set your course up for you, including assignments and students. It is intended to show you how to obtain information and make small changes, not how to act as an administrator or write problems.
(#) Contents
- First Look
- Getting Information About Students and Assignments
- Making Simple Changes
- Testing Problems
- More Advanced Modifications
- Timed Tests
# First Look
## Logging in
The RU WeBWorK server is at https://webwork.radford.edu. When you go to that page, you will
see a list of courses:
 In the image above, the mouse cursor has stopped over a particular course, and the browser is displaying the URL for that course in the lower left-hand corner. When you hover over the link for your course on this page, you will see the URL that you will want to distribute to your students. To copy it, right-click the link and choose “Copy link location” or whatever similar command your browser offers.
To enter a particular course, click the link for that course and log in. You will land on the Homework Sets page for the course:
In the image above, the mouse cursor has stopped over a particular course, and the browser is displaying the URL for that course in the lower left-hand corner. When you hover over the link for your course on this page, you will see the URL that you will want to distribute to your students. To copy it, right-click the link and choose “Copy link location” or whatever similar command your browser offers.
To enter a particular course, click the link for that course and log in. You will land on the Homework Sets page for the course:
 Students see almost exactly what you see, except that they do not see the Instructor Tools link, or any of the links below it, in the left-hand menu.
## The basic pages
### User Settings
The User Settings link is useful if you want to change your password or the email at which students can contact you.
### Homework Sets
The Homework Sets page is shown above. It merely contains links to the homework sets and any tests or quizzes you may have set up. Much more is said about those below.
### Page for a particular homework set
The page for a particular homework set contains links for each of the problems in the set. It also shows, for each problem, the number of times you have attempted it (i.e., submitted an answer); the number of times you may still attempt it; its weight; and your current score.
Students see almost exactly what you see, except that they do not see the Instructor Tools link, or any of the links below it, in the left-hand menu.
## The basic pages
### User Settings
The User Settings link is useful if you want to change your password or the email at which students can contact you.
### Homework Sets
The Homework Sets page is shown above. It merely contains links to the homework sets and any tests or quizzes you may have set up. Much more is said about those below.
### Page for a particular homework set
The page for a particular homework set contains links for each of the problems in the set. It also shows, for each problem, the number of times you have attempted it (i.e., submitted an answer); the number of times you may still attempt it; its weight; and your current score.
 To work on a problem, click its link.
### Page for a particular problem
The image below shows a student view of a particular problem. Your view is identical except for the addition of a little extra information (such as the name of the file that contains the problem definition and a link to edit that file).
To work on a problem, click its link.
### Page for a particular problem
The image below shows a student view of a particular problem. Your view is identical except for the addition of a little extra information (such as the name of the file that contains the problem definition and a link to edit that file).
 Navigation buttons appear above the problem, answer buttons below. The Preview My Answers button is really only useful in courses in which students may enter complicated expressions as answers. The Submit Answers button is the only way for students to submit answers. In particular, clicking Next or Previous will not submit answers—something that should be emphasized when introducing the system to students.
The problem display contains other information as well, including your current score on the problem and the number of times you may re-attempt the problem.
The last item is the Email your instructor button. Students should always use this button when they want to ask you a question about the problem, as the email that they send will then contain a link back to their particular version of the problem.
### Classlist Editor
Navigation buttons appear above the problem, answer buttons below. The Preview My Answers button is really only useful in courses in which students may enter complicated expressions as answers. The Submit Answers button is the only way for students to submit answers. In particular, clicking Next or Previous will not submit answers—something that should be emphasized when introducing the system to students.
The problem display contains other information as well, including your current score on the problem and the number of times you may re-attempt the problem.
The last item is the Email your instructor button. Students should always use this button when they want to ask you a question about the problem, as the email that they send will then contain a link back to their particular version of the problem.
### Classlist Editor
 The Classlist Editor page has many useful functions which will be discussed in a later section. Here we merely point out that all the basic information on your students is listed.
If you hover over one of the Email links, the student’s email will be shown in a tooltip (probably near the bottom of the browser window).
### Hmwk Sets Editor
The Classlist Editor page has many useful functions which will be discussed in a later section. Here we merely point out that all the basic information on your students is listed.
If you hover over one of the Email links, the student’s email will be shown in a tooltip (probably near the bottom of the browser window).
### Hmwk Sets Editor
 The Hmwk Sets Editor page also exposes many useful functions which will be discussed later. A basic use is to see what assignments are defined, how many questions are in each assignment, how many class participants (instructors and students) are assigned each set, and the open date, due date, and answers-available date for each assignment.
### Library Browser
WeBWorK comes with more than 20,000 problems, most of which are matched to particular widely-used textbooks. The Library Browser page allows you to choose problems to add to your sets. Little will be said about this here.
### Statistics
The Hmwk Sets Editor page also exposes many useful functions which will be discussed later. A basic use is to see what assignments are defined, how many questions are in each assignment, how many class participants (instructors and students) are assigned each set, and the open date, due date, and answers-available date for each assignment.
### Library Browser
WeBWorK comes with more than 20,000 problems, most of which are matched to particular widely-used textbooks. The Library Browser page allows you to choose problems to add to your sets. Little will be said about this here.
### Statistics

The Statistics page presents a number of useful statistics. In the image above, for example, a chart and table give information that might be used to judge the difficulty of questions on a final exam. (Because exams only allow one answer to be submitted for each problem, the “avg attempts” row isn’t of much use here.)
### Student Progress
Two different views of student progress are available. Below we see the progress of various students on one assignment. This view is obtained by clicking on the assignment name on the Student Progress page:
 As you can see, the checkboxes at the top of the page allow various customized versions to be viewed.
We can also see the progress of one student on various assignments by clicking on the student’s name:
As you can see, the checkboxes at the top of the page allow various customized versions to be viewed.
We can also see the progress of one student on various assignments by clicking on the student’s name:
 The scoring style requires some interpretation:
 The second row of numbers, which shows the number of incorrect attempts at each problem, can help you to see where your students are struggling. Students see it, too, and should be reassured that their grade does not depend on the number of times they try a problem.
### Scoring Tools
The Scoring Tools page is pretty much self-explanatory. Select the assignments you want scored from the box and then click “Score selected sets and save to:”. In a few seconds the scores will appear, along with a link (circled in the image below) that you can use to download the scores as a CSV file that Microsoft Excel can read.
The second row of numbers, which shows the number of incorrect attempts at each problem, can help you to see where your students are struggling. Students see it, too, and should be reassured that their grade does not depend on the number of times they try a problem.
### Scoring Tools
The Scoring Tools page is pretty much self-explanatory. Select the assignments you want scored from the box and then click “Score selected sets and save to:”. In a few seconds the scores will appear, along with a link (circled in the image below) that you can use to download the scores as a CSV file that Microsoft Excel can read.

### File Manager

This page allows you to upload and download files and to copy or delete them. You will have only limited use for it.
### Course Configuration
You should not change settings on the Course Configuration page unless you know exactly what you are doing.
### Instructor Tools
The Instructor Tools page brings together a bunch of often-used functions that are also provided by other pages:
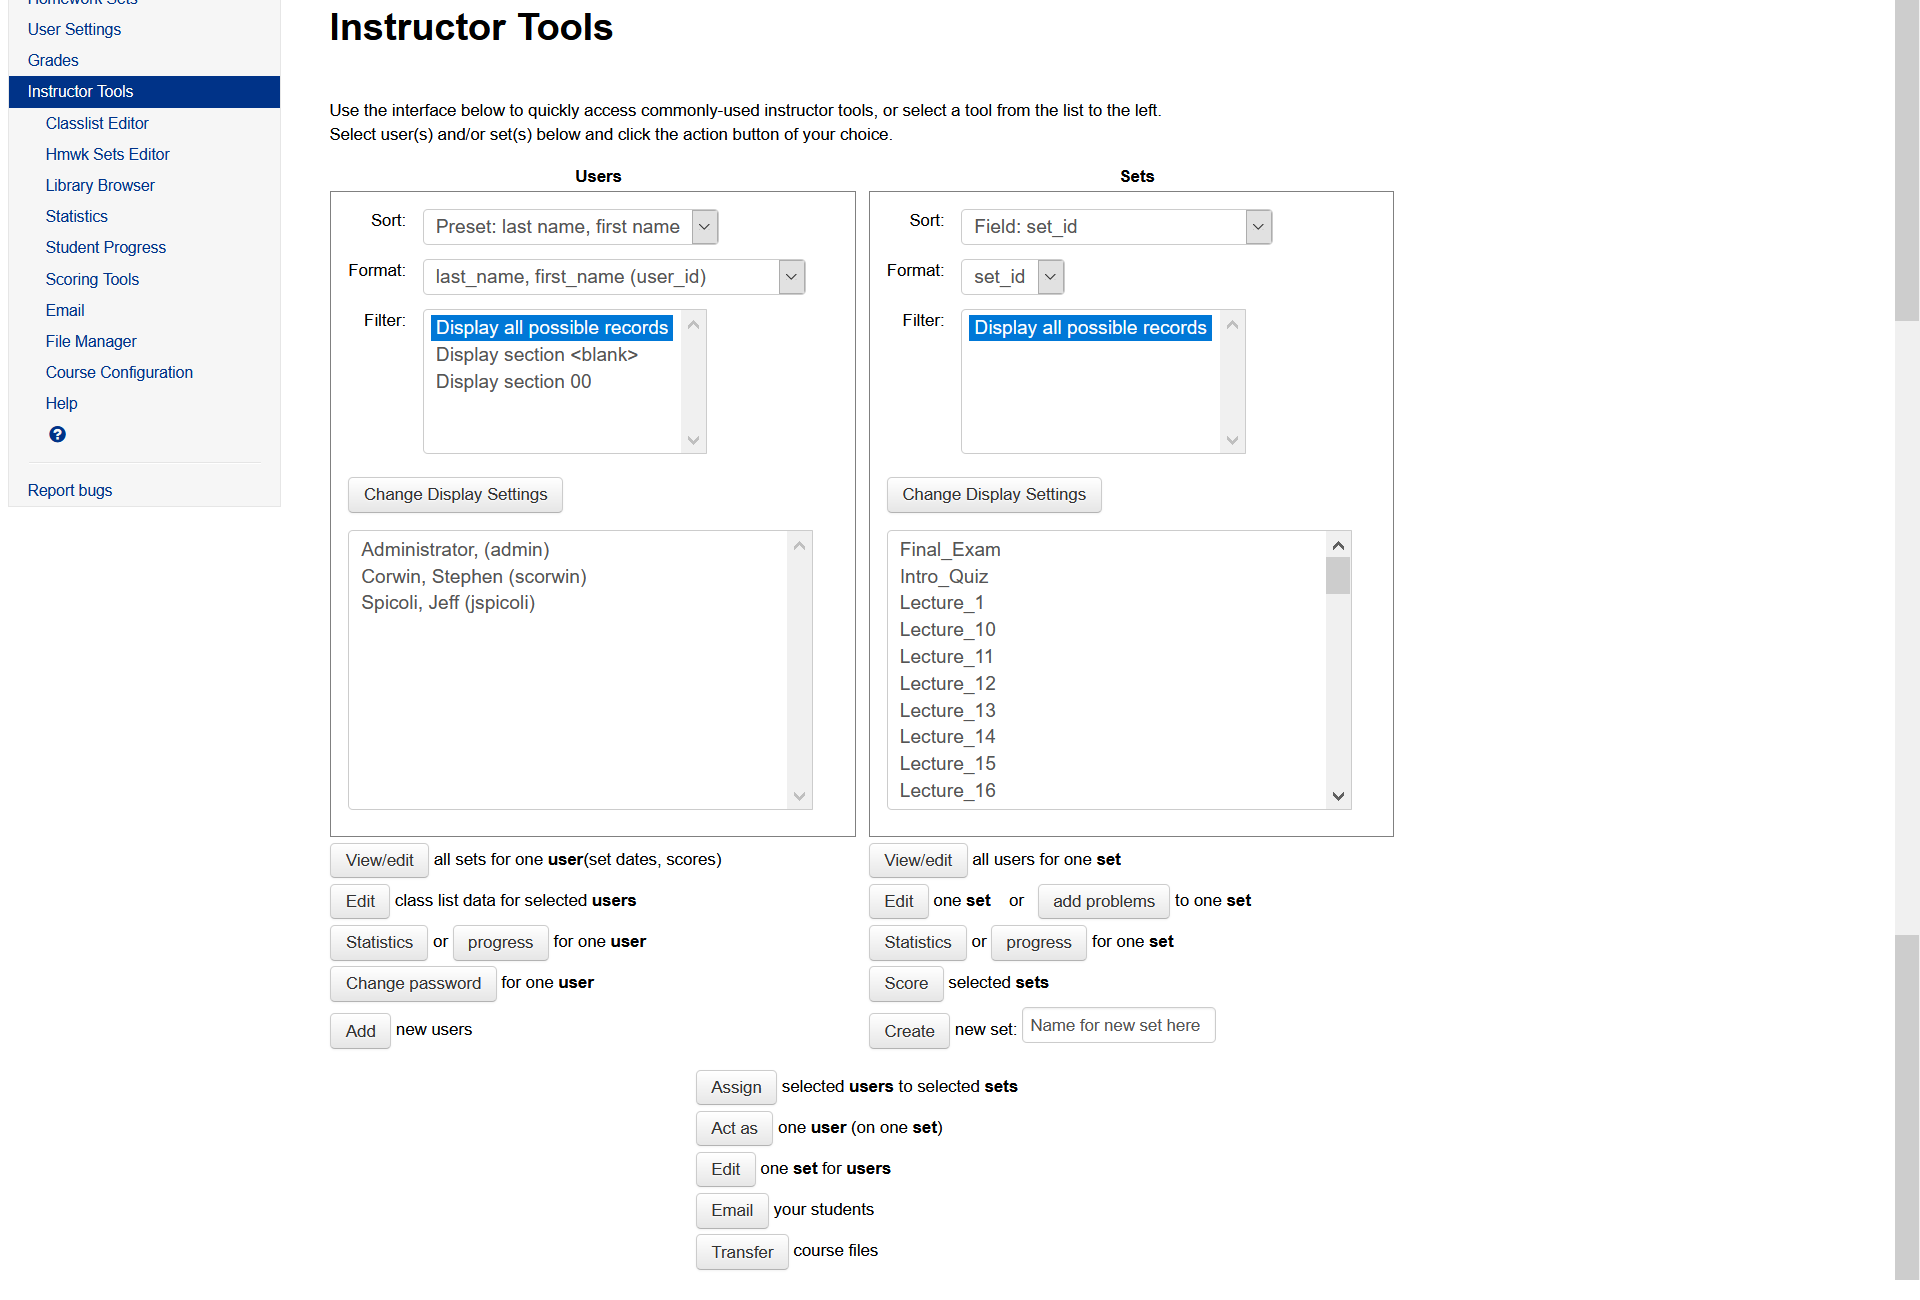 Each column contains a pair of settings boxes that you will rarely need to touch. Below those boxes are a list of all users and a list of all assignments; and below those, three sets of buttons. The buttons below the Users column operate only on users. That is, they are used by selecting users from the Users list and then clicking the button. Similarly, the buttons below the Sets list operate only on sets. The buttons in the centered group at the bottom operate on combinations of users and sets.
# Getting Information About Students and Assignments
## See class roster
The Classlist Editor page shows your class roster. Please see the Classlist Editor section above to see how to get basic information from this page.
## See open/due/answer dates
WeBWorK assignments have three dates (really, dates-and-times) associated to them:
Each column contains a pair of settings boxes that you will rarely need to touch. Below those boxes are a list of all users and a list of all assignments; and below those, three sets of buttons. The buttons below the Users column operate only on users. That is, they are used by selecting users from the Users list and then clicking the button. Similarly, the buttons below the Sets list operate only on sets. The buttons in the centered group at the bottom operate on combinations of users and sets.
# Getting Information About Students and Assignments
## See class roster
The Classlist Editor page shows your class roster. Please see the Classlist Editor section above to see how to get basic information from this page.
## See open/due/answer dates
WeBWorK assignments have three dates (really, dates-and-times) associated to them:
- The open date, which is the date on which students can first attempt the assignment;
- The due date after which no more attempts can be made;
- The answer date, which is the date on which students can first see the correct answers to problems.
All of these are available on the Hmwk Sets Editor page.
## See student progress
This is explained in the Student Progress section above.
## See all answers submitted by a student
*Note.* The procedure outlined here works for ordinary homework sets only. To see answers submitted on a timed test, please see the section See answers submitted by a student on a timed test.
Begin by going to the Classlist Editor page and clicking on the student’s name. You will see the student’s Homework Sets page, as you are now acting as the student.
The image below shows instructor scorwin acting as student jspicoli, as the little box in the upper right-hand corner of the page indicates:

We will see all the answers that Mr. Spicoli has given to Problem 9 in Lecture 2. We begin by clicking on Lecture 2 from the Homework Sets page, which brings us to the following page:
 From here, we click on the link for Problem 9, which brings us to a normal problem page. This particular problem contains serveral dropdowns from which the student must select answers:
 Because we are logged in as an instructor, however, a button labeled Show Past Answers appears at the bottom of the page. When we click that button, we see the Answer Log page for the problem:
 This is pretty easy to read. It shows that when Mr. Spicoli first submitted the problem at 2:44, he had selected an answer to the first part only. Very soon, however, he chose an answer to the second part of the problem and re-submitted it. At his third submission, he had chosen answers for all but the last part of the problem, and at his fourth, he had chosen answers for all parts. Finally, realizing that he had still not gotten the problem completely right, he changed his answer to the first part and submitted the problem again.
## See the exact problem that a student sees
Go to the Classlist Editor page and click on the student's name to "act as" the student, then go to the homework set and problem you want to see.
When students email you from within particular problems using the "Email your instructor" button, their email includes a link that sends you directly to the problem they see.
# Making Simple Changes
## Changing open/due/answer dates on one assignment for all students
Video [youtube]
Click on the Hmwk Sets Editor link. You will see a page like the following:
This is pretty easy to read. It shows that when Mr. Spicoli first submitted the problem at 2:44, he had selected an answer to the first part only. Very soon, however, he chose an answer to the second part of the problem and re-submitted it. At his third submission, he had chosen answers for all but the last part of the problem, and at his fourth, he had chosen answers for all parts. Finally, realizing that he had still not gotten the problem completely right, he changed his answer to the first part and submitted the problem again.
## See the exact problem that a student sees
Go to the Classlist Editor page and click on the student's name to "act as" the student, then go to the homework set and problem you want to see.
When students email you from within particular problems using the "Email your instructor" button, their email includes a link that sends you directly to the problem they see.
# Making Simple Changes
## Changing open/due/answer dates on one assignment for all students
Video [youtube]
Click on the Hmwk Sets Editor link. You will see a page like the following:
 Find the row corresponding to the set you want to modify, and click on the number in the “Edit Problems” column (which is the number of problems in the set). In this example we will change the dates for the Lecture 1 set, so we click on the link circled above. The result is the following page, called a Set Detail page:
 Here the dates are exposed as plain text fields which you may edit to taste. Be sure to follow the existing pattern very closely, or your changes will not be accepted. Also be sure that the open date you set is no later than the due date and that the due date is no later than the answer date—mistakes I have made many times. If you click Save Changes and your changes are rejected, the program will tell you why they were rejected. When this happens, use your browser’s Back button to return to the editing page. (If you click on the obvious link in the left-hand menu, you will get the same page but with all your entries gone.)
## Changing open/due/answer dates on several assignments for all students
Video [youtube]
Go to the Hmwk Sets Editor page. In the row of links near the top, choose Edit.
Here the dates are exposed as plain text fields which you may edit to taste. Be sure to follow the existing pattern very closely, or your changes will not be accepted. Also be sure that the open date you set is no later than the due date and that the due date is no later than the answer date—mistakes I have made many times. If you click Save Changes and your changes are rejected, the program will tell you why they were rejected. When this happens, use your browser’s Back button to return to the editing page. (If you click on the obvious link in the left-hand menu, you will get the same page but with all your entries gone.)
## Changing open/due/answer dates on several assignments for all students
Video [youtube]
Go to the Hmwk Sets Editor page. In the row of links near the top, choose Edit.
 Click in the little checkbox next to each assignment you want to modify, as I have done for the first four assignments in the image above. Ensure that the Edit which sets? dropdown is set to selected sets, and then click the Take Action! button to see a page like the following, on which the dates for all the assignments you chose are exposed as simple text fields:
 Simply edit the dates as you wish. When you’re done, ensure that “Save Edit” is selected at the top, and click Take Action!. As always, make sure that the open date you set is no later than the due date and that the due date is no later than the answer date. If any change is rejected, use the browser’s Back button to return to the edit page.
## Change open/due/answer dates for one student on one assignment
Video [youtube]
Go to the Hmwk Sets Editor page and find the row for the assignment of interest. Click on the fraction in the “Edit Assigned Users” column in that row. (The fraction is $\frac{\text{number of people to whom the set is assigned}}{\text{number of people in the class}}$.) You will reach a page like the following:
Simply edit the dates as you wish. When you’re done, ensure that “Save Edit” is selected at the top, and click Take Action!. As always, make sure that the open date you set is no later than the due date and that the due date is no later than the answer date. If any change is rejected, use the browser’s Back button to return to the edit page.
## Change open/due/answer dates for one student on one assignment
Video [youtube]
Go to the Hmwk Sets Editor page and find the row for the assignment of interest. Click on the fraction in the “Edit Assigned Users” column in that row. (The fraction is $\frac{\text{number of people to whom the set is assigned}}{\text{number of people in the class}}$.) You will reach a page like the following:
 To change the dates for Mr. Spicoli, click on the link labeled Edit data for jspicoli. You will see a page like the following:
 On that page, the “User Values” column shows None Specified for any dates that have never been edited. You can enter dates as usual, following the pattern of the dates in the “Class Values” column, but in order for your changes to be accepted, you must also check the boxes in the left-hand column for any dates you want changed. Below, I have done that for all three dates:
 Finally, click Save Changes to save your edits. (The page will simply reload.)
## Assign a set to a student or students
Video [youtube]
Go to the Hmwk Sets Editor and click the fraction in the “Edit Assigned Users” column and the row of the set you wish to assign to a student or students. The result should be a page like the one pictured below.
Check the box next to the name of each student to whom you wish to assign the set, and then click Save.
## Change what a problem is worth
Video [youtube]
The number of points a problem is worth is called its weight in WW. If a problem has $n$ parts, WW awards $\frac{weight}{n}$ points for each part correct.
To change a problem's weight, go to the Hmwk Sets Editor and then click on the number in the “Edit Problems” column for the assignment containing the problem you want to modify. A "Set Detail" page for the set, looking something like the image below, should appear.
Finally, click Save Changes to save your edits. (The page will simply reload.)
## Assign a set to a student or students
Video [youtube]
Go to the Hmwk Sets Editor and click the fraction in the “Edit Assigned Users” column and the row of the set you wish to assign to a student or students. The result should be a page like the one pictured below.
Check the box next to the name of each student to whom you wish to assign the set, and then click Save.
## Change what a problem is worth
Video [youtube]
The number of points a problem is worth is called its weight in WW. If a problem has $n$ parts, WW awards $\frac{weight}{n}$ points for each part correct.
To change a problem's weight, go to the Hmwk Sets Editor and then click on the number in the “Edit Problems” column for the assignment containing the problem you want to modify. A "Set Detail" page for the set, looking something like the image below, should appear.
 Scroll down to find the problem of interest, replace the number in the Weight field with your preferred value, and click Save Changes at the bottom of the page (not shown).
## Un-assign and re-assign a homework set for one student
Video [youtube]
Un-assigning a homework set destroys all information about that student’s interaction with the set—his grades, numbers of attempts, etc.—and there is no way to recover the information. Un-assigning should be done only after careful consideration.
That said, sometimes you simply want to let a student try a whole homework set again, and the easiest way to do that is to un-assign and then re-assign the set. Start by going to the Hmwk Sets Editor page and clicking on the fraction in the “Edit Assigned Users” column in the row corresponding to the homework set you want to un-assign and/or re-assign. (See the section above for illustrations.) The result will be a page like the following:
To un-assign a student, simply click to remove the check mark in the student’s row, and then click the Save button at the bottom of the page.
To assign the set to a student, click to place a check mark in the student’s row, and then click the Save button at the bottom of the page.
## Change a student’s password
Video [youtube]
WeBWorK does not store plaintext passwords, so passwords cannot be recovered. When a student forgets his password, therefore, all you can do is to reset it to something simple (probably the last six digits of his ID number). Then he can log in and, if he likes, change the password to something more secure.
Click the Instructor Tools link in the left-hand menu. (See above for a picture of and brief introduction to this page.) Click the student’s name in the Users list to select it, and then click the Change password button below that list. The result will be a specialized User Settings page:
Scroll down to find the problem of interest, replace the number in the Weight field with your preferred value, and click Save Changes at the bottom of the page (not shown).
## Un-assign and re-assign a homework set for one student
Video [youtube]
Un-assigning a homework set destroys all information about that student’s interaction with the set—his grades, numbers of attempts, etc.—and there is no way to recover the information. Un-assigning should be done only after careful consideration.
That said, sometimes you simply want to let a student try a whole homework set again, and the easiest way to do that is to un-assign and then re-assign the set. Start by going to the Hmwk Sets Editor page and clicking on the fraction in the “Edit Assigned Users” column in the row corresponding to the homework set you want to un-assign and/or re-assign. (See the section above for illustrations.) The result will be a page like the following:
To un-assign a student, simply click to remove the check mark in the student’s row, and then click the Save button at the bottom of the page.
To assign the set to a student, click to place a check mark in the student’s row, and then click the Save button at the bottom of the page.
## Change a student’s password
Video [youtube]
WeBWorK does not store plaintext passwords, so passwords cannot be recovered. When a student forgets his password, therefore, all you can do is to reset it to something simple (probably the last six digits of his ID number). Then he can log in and, if he likes, change the password to something more secure.
Click the Instructor Tools link in the left-hand menu. (See above for a picture of and brief introduction to this page.) Click the student’s name in the Users list to select it, and then click the Change password button below that list. The result will be a specialized User Settings page:
 Enter your password and the new password for the student (twice). Then scroll to the bottom of the page and click Change User Settings (not shown).
## Give a student credit for a problem
Video [youtube]
Sometimes, if a problem is found to have a bug, or if you agree with a student that the problem is insufficiently straightforwardly worded, you may want to give the student credit for the problem. Begin by going to the Hmwk Sets Editor page. Find the row for the assignment of interest, click on the fraction in the “Edit Assigned Users” column in that row, and then click on the "Edit data for (the student's username)." The image below shows the result when instructor scorwin followed this procedure for student jspicoli:
Enter your password and the new password for the student (twice). Then scroll to the bottom of the page and click Change User Settings (not shown).
## Give a student credit for a problem
Video [youtube]
Sometimes, if a problem is found to have a bug, or if you agree with a student that the problem is insufficiently straightforwardly worded, you may want to give the student credit for the problem. Begin by going to the Hmwk Sets Editor page. Find the row for the assignment of interest, click on the fraction in the “Edit Assigned Users” column in that row, and then click on the "Edit data for (the student's username)." The image below shows the result when instructor scorwin followed this procedure for student jspicoli:
 Below the box containing dates, etc., is a list of all the problems in the homework set and some settings for each. The setting of interest here is Status. The number in the Status field gives the student’s score on the problem as a number between 0 and 1. For a problem that can only be right or wrong, the number must be 0 or 1, but for a problem that allows partial credit, it need not be.
On the page shown above, Mr. Spicoli has no credit for Problem 1. To give him full credit for that problem, enter a 1 in the Status field, then scroll to the bottom of the page and click Save Changes (not shown).
## Add students to the course
Video [youtube]
Navigate to the Classlist Editor page and then click on the “Add” link in the horizontal menu along the top. The page will change to show something like the following:
Below the box containing dates, etc., is a list of all the problems in the homework set and some settings for each. The setting of interest here is Status. The number in the Status field gives the student’s score on the problem as a number between 0 and 1. For a problem that can only be right or wrong, the number must be 0 or 1, but for a problem that allows partial credit, it need not be.
On the page shown above, Mr. Spicoli has no credit for Problem 1. To give him full credit for that problem, enter a 1 in the Status field, then scroll to the bottom of the page and click Save Changes (not shown).
## Add students to the course
Video [youtube]
Navigate to the Classlist Editor page and then click on the “Add” link in the horizontal menu along the top. The page will change to show something like the following:
 Enter the number of students you wish to add and then click Take Action!. The image below shows the resulting page when one student is to be added. (When more than one student is to be added, the table will contain more than one row.)
 Fill in the fields with the student’s information. Only the Student ID and Login Name fields are required, but you will be happiest in the long run if you fill in all but the last two fields.
Note. At RU, we normally use only the last six digits of students’ ID numbers rather than all nine, and login names are normally set to RU usernames. (If you know a student’s RU email address, then her username is the portion before the @ sign.)
To assign homework sets to the new students, select the sets from the dropdown provided. When you have provided all the information you wish to provide, click the Add Students button.
## Change the number of times a problem may be attempted
Video [youtube]
Go to the Hmwk Sets Editor page and click on the number in the Edit Problems column and the row for the homework set. You will see the Set Detail page for the set.
Scroll down to find the entry for the problem of interest. You should see something like the image below.
Fill in the fields with the student’s information. Only the Student ID and Login Name fields are required, but you will be happiest in the long run if you fill in all but the last two fields.
Note. At RU, we normally use only the last six digits of students’ ID numbers rather than all nine, and login names are normally set to RU usernames. (If you know a student’s RU email address, then her username is the portion before the @ sign.)
To assign homework sets to the new students, select the sets from the dropdown provided. When you have provided all the information you wish to provide, click the Add Students button.
## Change the number of times a problem may be attempted
Video [youtube]
Go to the Hmwk Sets Editor page and click on the number in the Edit Problems column and the row for the homework set. You will see the Set Detail page for the set.
Scroll down to find the entry for the problem of interest. You should see something like the image below.
 Type the number of attempts you want to allow into the box labeled Max attempts, overwriting whatever is there. If you want to allow unlimited attempts, type in the word unlimited.
Scroll to the bottom of the page and click Save Changes.
## Remove a problem from a homework set
Video [youtube]
To do this, go to the Hmwk Sets Editor page and click on the number in the Edit Problems column and the row for the homework set containing the offending problem. This will bring you to the homework set’s Set Detail page. At the top of that page some information about the whole set is exposed, but what we want here is the detail for a particular problem, for which you must scroll down. When you do, you will see something like the following:
To delete a problem, check the box marked Delete it? and then scroll to the bottom of the page and click Save Changes (not shown).
“Deleting” a problem from a set does not delete the problem itself. If you delete a problem accidentally, contact your WeBWorK administrator to recover it.
# Testing Problems
Video [youtube]
When others supply you with new problems, you should test those problems extensively. One important component of testing is to change the problem seed, an integer that controls how the randomized portions of problems are generated. Each student gets a different seed, and you should test problems with a number of different seeds to try to catch bugs that show up only in certain circumstances.
To view a problem using a particular seed, go to the problem’s page. Below the problem you will see a link labeled Edit2. When you click the Edit2 link, you will see a page like the one shown below:
Type the number of attempts you want to allow into the box labeled Max attempts, overwriting whatever is there. If you want to allow unlimited attempts, type in the word unlimited.
Scroll to the bottom of the page and click Save Changes.
## Remove a problem from a homework set
Video [youtube]
To do this, go to the Hmwk Sets Editor page and click on the number in the Edit Problems column and the row for the homework set containing the offending problem. This will bring you to the homework set’s Set Detail page. At the top of that page some information about the whole set is exposed, but what we want here is the detail for a particular problem, for which you must scroll down. When you do, you will see something like the following:
To delete a problem, check the box marked Delete it? and then scroll to the bottom of the page and click Save Changes (not shown).
“Deleting” a problem from a set does not delete the problem itself. If you delete a problem accidentally, contact your WeBWorK administrator to recover it.
# Testing Problems
Video [youtube]
When others supply you with new problems, you should test those problems extensively. One important component of testing is to change the problem seed, an integer that controls how the randomized portions of problems are generated. Each student gets a different seed, and you should test problems with a number of different seeds to try to catch bugs that show up only in certain circumstances.
To view a problem using a particular seed, go to the problem’s page. Below the problem you will see a link labeled Edit2. When you click the Edit2 link, you will see a page like the one shown below:
 You should certainly not edit the problem’s source code unless you know what you are doing. Fortunately, all that you have to do to view the problem with a different seed is to enter a nonnegative integer in the box labeled Using what seed? and then click Take Action!. (If you don’t see the Using what seed? box, click View in the horizontal menu near the bottom of the problem.)
I recommend checking the box labeled Open in new window, as it eases the process of testing with a variety of different seeds.
Besides checking problems using different seeds, you should check that correct answers are accepted and incorrect ones rejected. You should also check that tolerances are respected: e.g., if the problem says that an answer must be given to three decimal places and the computed answer is 1.2345, are both 1.234 and 1.235 accepted? Finally, you should enter absurd data to check that the problem generates a sensible response. In the case pictured below, for example, the string asdf was entered where a number was expected, and the system responded appropriately:
You should certainly not edit the problem’s source code unless you know what you are doing. Fortunately, all that you have to do to view the problem with a different seed is to enter a nonnegative integer in the box labeled Using what seed? and then click Take Action!. (If you don’t see the Using what seed? box, click View in the horizontal menu near the bottom of the problem.)
I recommend checking the box labeled Open in new window, as it eases the process of testing with a variety of different seeds.
Besides checking problems using different seeds, you should check that correct answers are accepted and incorrect ones rejected. You should also check that tolerances are respected: e.g., if the problem says that an answer must be given to three decimal places and the computed answer is 1.2345, are both 1.234 and 1.235 accepted? Finally, you should enter absurd data to check that the problem generates a sensible response. In the case pictured below, for example, the string asdf was entered where a number was expected, and the system responded appropriately:
 # More Advanced Modifications
## Create a homework set
Video [youtube]
Go to the Hmwk Sets Editor page. In the row of links near the top, click Create. The page will change to something like the following:
# More Advanced Modifications
## Create a homework set
Video [youtube]
Go to the Hmwk Sets Editor page. In the row of links near the top, click Create. The page will change to something like the following:
 Type in a name for the new set. The new set is empty by default, but you may elect to have it made as a copy of an existing set instead by selecting an existing set from the Create as what type of set? dropdown. When you are ready, click Take Action! The page will reload, and your new set will appear in the list.
Whenever you want your new set’s name to contain a space, use an underscore instead. E.g., if you want the name to be “A Homework Set”, type in A_Homework_Set.
## Copy problems from one set to another
Video: copy from one set to another [youtube]
Video: add problems from the OPL [youtube]
Click Library Browser in the left-hand menu. A page like the one below will appear. Then:
1. From the Add problems to Target Set: dropdown, choose the set to which you wish to add problems.
2. Click the button labeled From This Course.
3. From the dropdown labeled Browse from, choose the homework set from which you wish to copy a problem or problems.
Type in a name for the new set. The new set is empty by default, but you may elect to have it made as a copy of an existing set instead by selecting an existing set from the Create as what type of set? dropdown. When you are ready, click Take Action! The page will reload, and your new set will appear in the list.
Whenever you want your new set’s name to contain a space, use an underscore instead. E.g., if you want the name to be “A Homework Set”, type in A_Homework_Set.
## Copy problems from one set to another
Video: copy from one set to another [youtube]
Video: add problems from the OPL [youtube]
Click Library Browser in the left-hand menu. A page like the one below will appear. Then:
1. From the Add problems to Target Set: dropdown, choose the set to which you wish to add problems.
2. Click the button labeled From This Course.
3. From the dropdown labeled Browse from, choose the homework set from which you wish to copy a problem or problems.
 Now click the View Problems button to see a page (or pages) with all the problems from the source set:
 To add a problem to the target set, simply click the blue Add button above its display on this page.
## Delete a homework set
Video [youtube]
Deleting a homework set deletes all records associated with the set—to whom it was assigned, all their scores, and so on—and there is no way to recover that information. Be careful.
To delete a set, go to the Hmwk Sets Editor. In the horizontal menu near the top, click Delete. You should see a page like the following:
To add a problem to the target set, simply click the blue Add button above its display on this page.
## Delete a homework set
Video [youtube]
Deleting a homework set deletes all records associated with the set—to whom it was assigned, all their scores, and so on—and there is no way to recover that information. Be careful.
To delete a set, go to the Hmwk Sets Editor. In the horizontal menu near the top, click Delete. You should see a page like the following:
 Check each set that you want to delete, and then choose Selected sets from the dropdown labeled Delete how many?. Finally, click the Take Action! button to delete the sets.
## Rename a homework set
Video [youtube]
There is no direct way to do this, but the workaround is simple.
1. Create a homework set with the new name. Make it a copy of the homework set you wish to rename.
2. Delete the old set.
# Timed Tests
WeBWorK’s name for a timed test is a gateway/quiz. (Your guess is as good as mine.)
## Turn a homework set into a timed test
Video [youtube]
This takes some doing. To start, go to the Hmwk Sets Editor. In the row for the homework set of interest, click the number in the “Edit Problems” column to get to the Set Detail page for the set:
Check each set that you want to delete, and then choose Selected sets from the dropdown labeled Delete how many?. Finally, click the Take Action! button to delete the sets.
## Rename a homework set
Video [youtube]
There is no direct way to do this, but the workaround is simple.
1. Create a homework set with the new name. Make it a copy of the homework set you wish to rename.
2. Delete the old set.
# Timed Tests
WeBWorK’s name for a timed test is a gateway/quiz. (Your guess is as good as mine.)
## Turn a homework set into a timed test
Video [youtube]
This takes some doing. To start, go to the Hmwk Sets Editor. In the row for the homework set of interest, click the number in the “Edit Problems” column to get to the Set Detail page for the set:
 On that page, choose “gateway/quiz” from the Assignment type dropdown and click Save Changes. The result will be a page like the one shown just below, on which items to be discussed below are indicated:
 The items numbered in the image above are the ones you must set. The open/due/answer dates are easier to understand if you remember that the first two are used here to set the beginning and end of the interval during which students may *begin* the test.
1. Opens: The first moment at which students may begin the test.
2. Answers Due: The last moment at which students may begin the test (as long as you have not chosen to Cap Test Time at Set Due Date).
3. Answers Available: When answers are available. For tests, I generally set this to nine or ten years after the due date. (You can’t set it to a date more than ten years after the due date.)
4. Hide Hints from Students: It is very unlikely that you want students to be able to see hints (if any) on test problems. Set this to Yes.
5. Test Time Limit: The duration of the test, in minutes. I always set this for five minutes longer than the amount of time I have told students to expect so that there is no question that they had time to click the Grade Test button before time was up.
6. Cap Test Time at Set Due Date?: If you set this to Yes, then the due date becomes the end of the interval during which students may submit the test rather than the end of the interval during which they may start it. I always set this to No.
7. Number of Graded Submissions per Test: The number of times students may submit the test. I always set this to 1.
8. Time Interval for New Test Versions: When students may submit the test more than once, this is the amount of time they must wait after a submission to begin the test again. I always leave it at 0 (the default).
9. Number of Tests per Time Interval: When students may submit the test more than once, this is the maximum number of times they may submit it within the time interval. I always set this to 1.
10. Order Problems Randomly: Self-explanatory. The only thing not obvious about this is the pain it will cause you if anything goes wrong. (Think, e.g., of finding a bug that appears occasionally in one problem.) I strongly recommend setting it to No.
11. Number of Problems per Page: Though it seems most natural to set this to 0, so that all the problems are on one page, there is a real advantage to setting it to a small number. Recall that there is no Submit button on tests. While a student is working on a page—entering or selecting answers—nothing is sent to the WeBWorK server. If the student loses connection to the internet, therefore, nothing about his work is recorded. When the student changes pages, however, all the information from all the pages is sent to the server and recorded there. Thus, if a student loses his internet connection before he can finish the test, you can still find out what answers he submitted up to that point (v.i.). I usually set this to 3.
12. Show Problems on Finished Tests: If you set this to Yes, then students will be able to see their test problems after the test is graded. I usually set this to No because I sometimes use problems that have solutions as test problems, and I do not ever want students to see solutions to them.
When you have set all items to the values you want, click the Save Changes button near the top of the page.
Notes
* Even a professor cannot take a test outside the time interval specified for that test. The best way to take the test is to duplicate it in another assignment which is assigned only to yourself and change the time interval to include the present.
* Tests are always listed below normal homework sets on Homework Sets pages. If your test is named, e.g., Test 2, then you (and students) will see a link labeled Take Test 2 test in the list. There is no way to change that text.
* Once a test is taken, a new entry for it will appear in the Homework Sets list. If the test was named Test 2, then the new entry will begin Test 2 (test 1) and will contain the word completed. If you set Show Problems on Finished Tests to Yes, then students can click this to see which problems they got right and which they got wrong. You will probably want to wait at least a few days after the test to allow this, to give yourself time to recover from any problems that may arise and to allow yourself the option to offer a version to a student after the class has taken the test.
## Make a separate test version
The items numbered in the image above are the ones you must set. The open/due/answer dates are easier to understand if you remember that the first two are used here to set the beginning and end of the interval during which students may *begin* the test.
1. Opens: The first moment at which students may begin the test.
2. Answers Due: The last moment at which students may begin the test (as long as you have not chosen to Cap Test Time at Set Due Date).
3. Answers Available: When answers are available. For tests, I generally set this to nine or ten years after the due date. (You can’t set it to a date more than ten years after the due date.)
4. Hide Hints from Students: It is very unlikely that you want students to be able to see hints (if any) on test problems. Set this to Yes.
5. Test Time Limit: The duration of the test, in minutes. I always set this for five minutes longer than the amount of time I have told students to expect so that there is no question that they had time to click the Grade Test button before time was up.
6. Cap Test Time at Set Due Date?: If you set this to Yes, then the due date becomes the end of the interval during which students may submit the test rather than the end of the interval during which they may start it. I always set this to No.
7. Number of Graded Submissions per Test: The number of times students may submit the test. I always set this to 1.
8. Time Interval for New Test Versions: When students may submit the test more than once, this is the amount of time they must wait after a submission to begin the test again. I always leave it at 0 (the default).
9. Number of Tests per Time Interval: When students may submit the test more than once, this is the maximum number of times they may submit it within the time interval. I always set this to 1.
10. Order Problems Randomly: Self-explanatory. The only thing not obvious about this is the pain it will cause you if anything goes wrong. (Think, e.g., of finding a bug that appears occasionally in one problem.) I strongly recommend setting it to No.
11. Number of Problems per Page: Though it seems most natural to set this to 0, so that all the problems are on one page, there is a real advantage to setting it to a small number. Recall that there is no Submit button on tests. While a student is working on a page—entering or selecting answers—nothing is sent to the WeBWorK server. If the student loses connection to the internet, therefore, nothing about his work is recorded. When the student changes pages, however, all the information from all the pages is sent to the server and recorded there. Thus, if a student loses his internet connection before he can finish the test, you can still find out what answers he submitted up to that point (v.i.). I usually set this to 3.
12. Show Problems on Finished Tests: If you set this to Yes, then students will be able to see their test problems after the test is graded. I usually set this to No because I sometimes use problems that have solutions as test problems, and I do not ever want students to see solutions to them.
When you have set all items to the values you want, click the Save Changes button near the top of the page.
Notes
* Even a professor cannot take a test outside the time interval specified for that test. The best way to take the test is to duplicate it in another assignment which is assigned only to yourself and change the time interval to include the present.
* Tests are always listed below normal homework sets on Homework Sets pages. If your test is named, e.g., Test 2, then you (and students) will see a link labeled Take Test 2 test in the list. There is no way to change that text.
* Once a test is taken, a new entry for it will appear in the Homework Sets list. If the test was named Test 2, then the new entry will begin Test 2 (test 1) and will contain the word completed. If you set Show Problems on Finished Tests to Yes, then students can click this to see which problems they got right and which they got wrong. You will probably want to wait at least a few days after the test to allow this, to give yourself time to recover from any problems that may arise and to allow yourself the option to offer a version to a student after the class has taken the test.
## Make a separate test version
learning disabilities, accommodation, extra time
This is commonly done to provide the test to a student at a different time from the rest of the class or to allow a student extra time. It is very easy to do, because a timed test is just an ordinary homework set with different settings. Simply make a copy of the test with a new name (probably something like `Spicoli_Test_2`) and then edit its settings as in the previous section.
When I do this, I normally un-assign the regular test from the student involved and assign the new version to that student.
## See answers submitted by a student on a timed test
Video [youtube]
This cannot be done in the same way as for ordinary homework problems (for which see See all answers submitted by a student). Instead:
1. Go to the Classlist Editor page and click on the student’s name to begin acting as the student.
2. Find the correct entry in the student’s Homework Sets list. Entries for completed tests contain the word completed. (They also contain a notation like (test 1) that is helpful when students may submit a test more than once.)
 3. Click on the link for the completed test to enter it. Scroll to the bottom of the page, check the box labeled Show correct answers, and click the Check Test button. You will see a page like the following:
 4. To see all answers submitted by the student, scroll to the bottom of the page and click Show Past Answers. A page like the following will open in a new tab. To understand the entries on this page, please see See all answers submitted by a student above.
 5. By default, only the answers for questions on the page on which you clicked the Check Test button are shown, but you may change this by editing the textfield labeled Problem (indicated in the image above) and then clicking the button labeled Past Answers for.