Using Dreamweaver Quickly
Quick-start notes by Bob Stepno
For COMS 326, COMS 226 & COMS 104
The biggest "secret" about Web publishing is that you don't need Dreamweaver or Flash or some other $400 program to do it. You can construct perfectly good, creative, colorful pages using nothing but TextEdit (Mac) or Notepad (Windows) or any number of UNIX editors and a knowledge of HTML and CSS.
However, we DO have Dreamweaver and other powerful programs available for free in all of our labs at Radford, so communication students should learn how to use them. Dreamweaver makes some of the most repetitious, tedious parts of Web coding easy. It provides pre-designed page layouts that you can learn to adapt, improve or ignore.
The other important secret: By the time you go to work doing Web production or online publishing for a living, there will be even more tools available, some taking advantage of the newest evolution of HTML -- XHTML -- HTML5 or (someday) HTML99... but with a real 21st century education, you will have learned how to switch tools, pick up new ones and put them to work.
So, on to Dreamweaver...
On Radford's server, here is the fastest way to create a Web page.
- Open your "H drive" home directory space from a lab computer.
- Open the "public_html" folder.
- MAKE a new folder inside "public_html" to hold your Web project
- Give the folder a short, simple name in lower-case letters with no punctuation or spaces, like "coms104" for the work done in that course or "mydog" for the home page you are making for your dog.
- Double-check to make sure the new folder is inside the public_html folder.
- Open Adobe Dreamweaver.
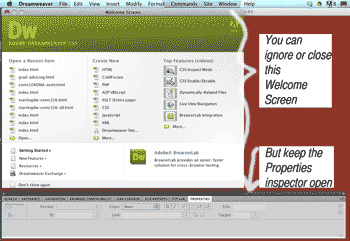
- Ignore or close the big green Welcome Screen.
- Ignore or close all the clustered menu panels on the right side of the screen. Keep the "Properties Inspector" panel at the bottom.
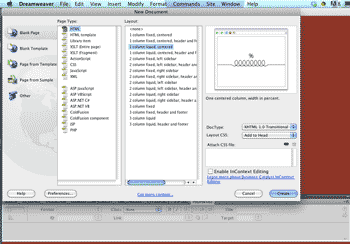
- From the "File" menu at the top of the screen, choose "New File."
- From the list of pre-designed layouts, choose a "Page Type" of "HTML" and a simple "Layout," such as "1 column, liquid, centered" or "1 column, liquid, centered, with header and footer."
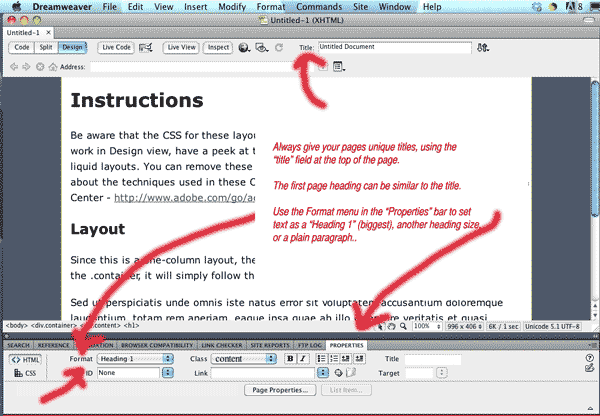
 At the top of the screen, fill the "Title" field with a clear, accurate description of your page contents: "Fred's favorite stories to share with journalism students" or "A home page for Fred, the best dog in town."
- Replace the page's large-type headline "Instructions" -- probably with something similar to your page title. (The title appears in the top frame of a browser; the headline appears on the page in big type.)
- Replace the page's "filler" text with whatever you have to say!
-
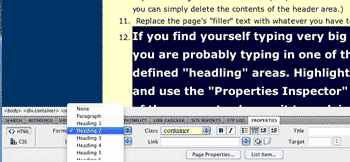
 If you find yourself entering very big, bold letters by accident, you probably started typing inside one of the layout's pre-defined "heading" areas, not in a simple "paragraph" area. Highlight the too-big text and use the "Format" menu in the "Properties Inspector" bar at the bottom of the screen to change it from "Heading 1" or "Heading 2" to "Paragraph."
- SAVE the page in the folder you just created, by choosing "Save as..." and navigating to that folder.
- Because this will be the main page in the folder, name it "index.html" -- and use lower case, for simplicity's sake. Every folder in a website has its own "index.html" main page, so make sure you are saving in the right folder.
- Using the "myRU.radford.edu" portal's "My Accounts" tab, choose "Update Web Permissions," then click "Click here to set file permissions."
- Preview your page at http://www.radford.edu/yourusername/yourfoldername (example: http://www.radford.edu/rstepno/coms104)
- MISSING BULLETS? IF you made a bullet list or numbered list and the bullets or numbers push off the center page into the background area, that's not something you did wrong. One or two CS5 Dreamweaver layouts "zeroed out" the default margins for lists throughout the document, a common design technique, but never set true margins for the main part of the page, which is the usual practice. Ask your professor to show you how to restore the margins in the CSS stylesheet -- or, for a quick fix, copy what you have written so far and paste it into a different Dreamweaver layout.
- FOR FUN: If you want to change the "body" background color or font colors, explore the "Modify: Page Properties" menu. See "Appearance CSS" and "Links CSS."


Next Steps with Dreamweaver
(for COMS 326 students or the very curious)
Note: The current (2011) version of Dreamweaver is part of Adobe's Creative Suite 5, abbreviated "CS5," which looks almost identical to the abbreviation "CSS" for "Cascading Style Sheets," the open standard for coding Web page visual design, coupled with "HTML" for coding Web page structure and content. I will write out "CS-Five" when necessary.
Readings:
- A 20-page article on using Dreamweaver's built-in layouts
- Dreamweaver Classroom in a Book assignment (This text is available with RU-login as an e-book; start with chapters 2 & 3, HTML/CSS. Also see the "Extras" tab for downloadable files that come on a CD with the hard-copy version of the book.)
- My main page of Dreamweaver links including video tutorials at Adobe's site.
- John Hildreth's CITL video tutorials on using Dreamweaver at Radford
- Lynda.com's Dreamweaver tutorials -- available by subscription, but the free-sample chapters can be very helpful, including this overview and this one on CSS Style Sheets.
More about the book and article later on this page.
Dreamweaver itself has evolved over more than 10 years to be part of a "creative suite" of terribly rich tools. Just look at its menus -- more than 200 commands to choose from and more than two dozen "control panels" or commands that manage them. When you go to open a new Dreamweaver document, you're offered a choice of 16 pre-coded layouts with HTML and CSS already in place; elsewhere, the program has a library of page and code samples.
If you used Dreamweaver Creative Suite 4, you may have been overwhelmed with the number of layouts it offered with confusing names like "liquid" and "elastic." That has been simplified in version 5. The comments in the code for the layouts also do a much better job of clarifying the use of DIVs, floats and more.
As it says on the "filler" text of those pages, "Be aware that the CSS for these layouts is heavily commented. If you do most of your work in Design view, have a peek at the code to get tips on working with the CSS..." My advice: Have more than "a peek."
Read the commented code for layouts very carefully. Print it out. Compare a "liquid" layout with a "fixed" layout. If you don't understand something, bring the code to class and ASK. For example, Dreamweaver usually includes some pre-coded style classes it thinks you might want to use, including container and content divs and float-right and float-left classes that you could use with any div, paragraph or image. Read the code enough to see what you need, what you don't need, and what you can learn from.
The Dreamweaver Classroom in a Book text has been updated to CS-Five and has a much improved introduction to basic HTML and CSS in chapters 2 and 3. Registered Radford students can access the e-book version through Safari books online through the library. (So are the CS3 and CS4 versions, which could be confusing.)
Meanwhile, Adobe's Stephanie Rewls has written the article linked above, an intro to using Dreamweaver CS-Five layouts, about 20 pages (Duplicate link: here: http://www.adobe.com/go/adc_css_layouts). She explains what Dreamweaver's designers were trying to accomplish with their heavily "commented" CSS code.
Another "secret": Dreamweaver is designed to "integrate with" (and sell) other Adobe tools -- especially Photoshop and Flash, and all are marketed to give the impression that they are essential to making Web pages. For example, a library of Javascript routines is included in Dreamweaver, which combines them with CSS and HTML to create widgets it calls "Spry tools," such as the "Spry menu bars" widget.
As you've seen, you can do interesting menus with rollover effects using nothing but CSS changes of background and foreground color and font attributes. You can explore more of Dreamweaver's power tools during the second half of COMS 326 or on your own using Dreamweaver texts and online tutorials.
For advanced students interested in more of the kinds of things "Spry" does, look into JavaScript programming, its use in combination with XML (AJAX), and in libraries of pre-written JavaScripts, especially jQuery. Follow those links to learn more about the technologies involved. Even if we don't deal with them in this short semester, W3Schools and other online tutorial sites (and library books) can help you build on what you learn here!